

| sitelink1 | http://tomcat.apache.org/connectors-doc/...ticleid=85 |
|---|---|
| sitelink2 | |
| extra_vars5 | |
| extra_vars6 |
▩ Windows 2000 Server + J2SDK 1.4.0 + Apache 2.0.47 + Tomcat 4.1.29
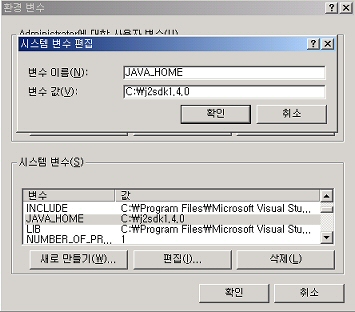
1. J2SDK1.4.0을 다운받아 설치합니다.
JAVA_HOME = C:j2sdk1.4.0 환경 변수를 지정합니다.
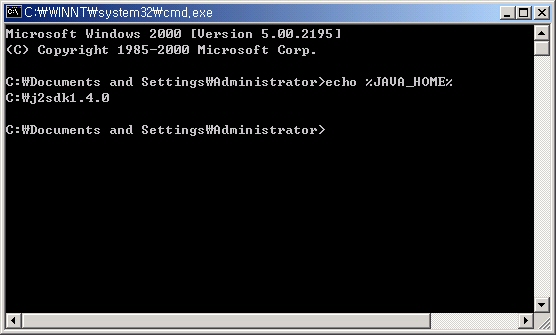
2. 도스창에서 환경변수가 제대로 적용이 되었는지 확인을 해봅니다.
3. 웹서버를 Apache를 사용할 것임으로 IIS를 열어서 80포트를 사용하지 않도록 기본 웹사이트를 정지 시킵니다.
4. http://httpd.apache.org/download.cgi 에 접속하여 Apache 2.0.47를 다운 받습니다.
파일명은 보통 apache_2.0.47-win32-x86-no_ssl.msi 형태를 갖고 있습니다. 설치를 시작합니다.

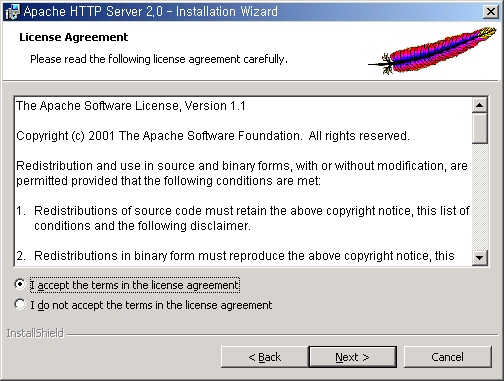
5. 라이센스에 무조건으로 동의합니다.
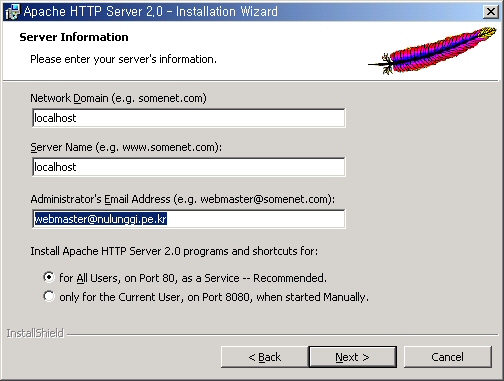
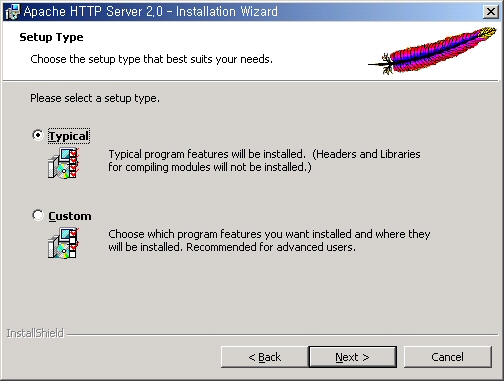
6. 아래처럼 입력한후 진행합니다.
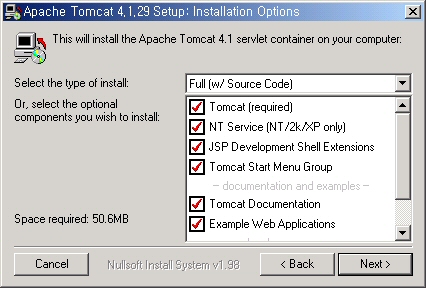
7. 권장설치를 합니다.
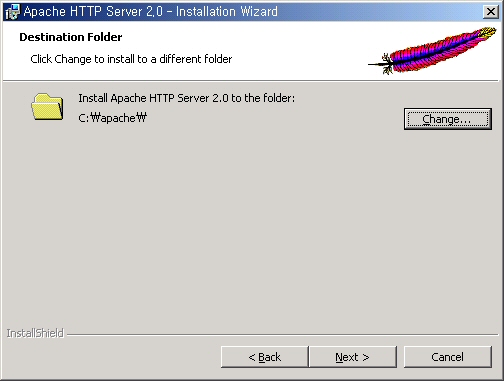
8. C:apache로 경로를 변경합니다.
9. 설치가 완료되었습니다.
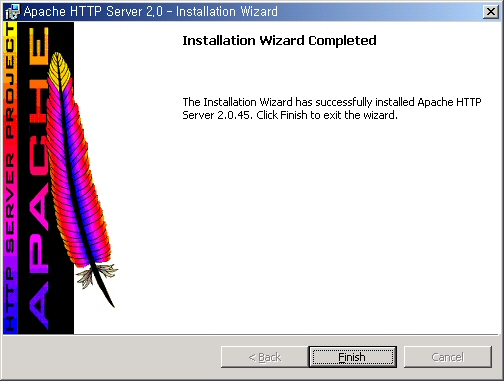
10. Apache가 정상적으로 설치가 되었습니다.
11. http://mirror.apache.or.kr/jakarta/tomcat-4/v4.1.29/bin/에 접속하여 jakarta-tomcat-4.1.29.exe 을 다운 받습니다.
설치를 시작합니다.
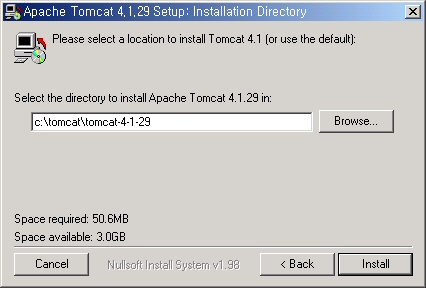
12. Tomcat이 설치될 폴더를 지정하고 진행합니다.
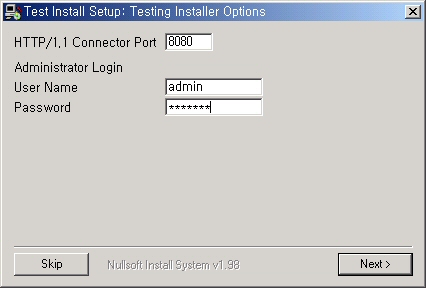
13. 관리자 계정을 입력합니다.
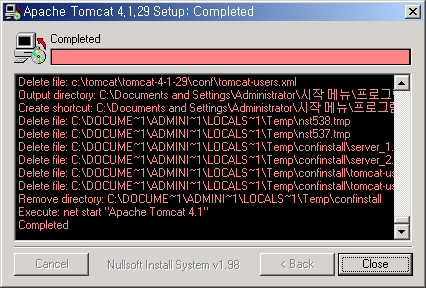
14. 톰캣 설치가 끝나습니다.
내 컴퓨터의 환경변수를 열고
TOMCAT_HOME = C:tomcattomcat-4-1-29 로 지정합니다.
CLASSPATH에 C:tomcattomcat-4-1-29commonlibservlet.jar을 추가합니다.
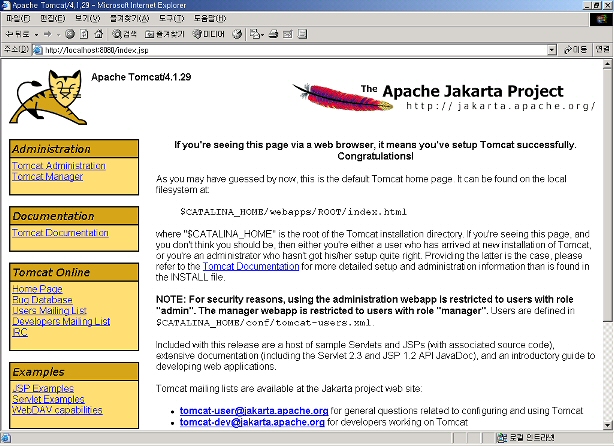
15. http://localhost:8080/index.jsp를 브러우저상에 입력하면 톰캣이 정상적으로 설치된것을 알수있습니다.
16. http://localhost:8080/examples/jsp/dates/date.jsp를 입력해 jsp가 정상적으로 작동되는지 확인합니다.
에러가 출력되지 않으면 정상적으로 작동한 것입니다.
17. http://localhost:8080/examples/servlet/HelloWorldExample를 입력해 서블릿이 정상적으로 작동하는지 확인합니다.
18. JK Connector의 설치
우리는 아파치 2.0.47용 jk커넥터를 설치해야 합니다.
http://mirror.apache.or.kr/jakarta/tomcat-connectors/jk/binaries/win32/ 접속하여
mod_jk_1.2.5_2.0.47.dll 을 다운받습니다.
c:apacheApache2modules폴더안으로 mod_jk_1.2.5_2.0.47.dll을 복사합니다.
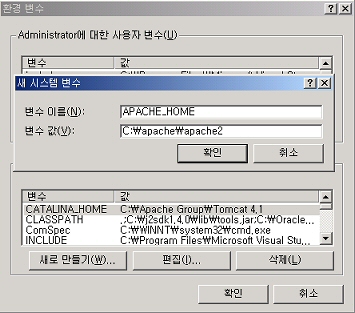
19. 내 컴퓨터에서 아래와 같이 환경변수를 지정합니다.
20. 원본 보존을 위해 C:apacheapache2conf폴더에 있는 httpd.conf를 복사해서 httpd.default.conf로 변경합니다.
만약 복사가 되어 있으면 httpd.conf를 편집합니다.
httpd.conf를 열어서 맨 마지막 라인에 LoadModule jk_module modules/mod_jk_1.2.5_2.0.47.dll 를 추가합니다.
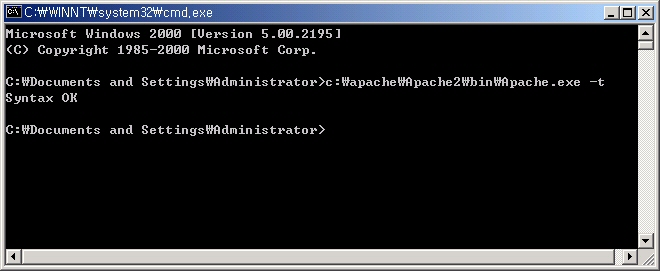
그런후 아래처럼 도스창을 오픈한 후 문법검사를 합니다.
c:apacheApache2binApache.exe -t
21. c:tomcattomcat-4-1-29conf 폴더에 있는 server.xml을 열어서
<Server port="8005" shutdown="SHUTDOWN" debug="0"> 라인을 찾아서 이 라인 아래에
<Listener className="org.apache.ajp.tomcat4.config.ApacheConfig" modJk="c:/apache/Apache2/modules/mod_jk_1.2.5_2.0.47.dll" /> 을 추가해 줍니다.
<Host name="localhost" debug="0" appBase="webapps" unpackWARs="true" autoDeploy="true"> 을 찾아서 이 라인 아래에
<Listener className="org.apache.ajp.tomcat4.config.ApacheConfig" append="true" forwardAll="false" modJk="c:/apache/Apache2/modules/mod_jk_1.2.5_2.0.47.dll" /> 을 추가합니다.
아래의 내용을 C:tomcattomcat-4-1-29confjk 폴더 아래에 workers.properties 저장합니다.
# BEGIN workers.properties
# Definition for Ajp13 worker
worker.list=ajp13
worker.ajp13.port=8009
worker.ajp13.host=localhost
worker.ajp13.type=ajp13
# END workers.properties
22. 관리도구-서비스에서 톰캣 서비스를 재 시작합니다.
C:tomcattomcat-4-1-29confauto 폴더안에 mod_jk.conf 파일이 생성되어 있으면 성공입니다.
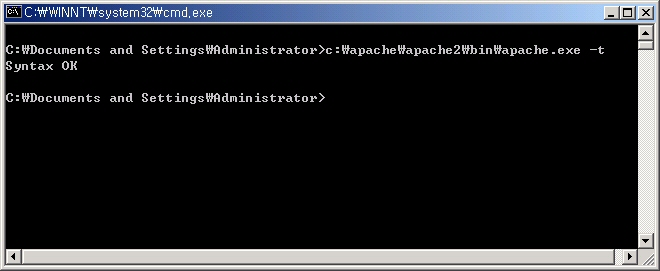
23. c:apacheApache2confhttpd.conf 파일을 열고 맨 아래부분에
Include c:/tomcat/tomcat-4-1-29/conf/auto/mod_jk.conf 을 추가합니다.
c:apacheApache2binApache.exe -t 문법 확인을 해봅니다.
24. Apache에서 테스트 문서 출력하기
먼저 톰캣을 실행하고 Apache를 실행합니다. 한글 출력을 원활히 하기 위해
<META HTTP-EQUIV="Content-type" CONTENT="text/html;charset=euc-kr">를 추가합니다.
C:apacheApache2htdocstest 폴더에 아래의 문서를 test.html로 저장합니다.
<!DOCTYPE HTML PUBLIC "-//W3C//DTD HTML 4.0 Transitional//EN">
<HTML>
<HEAD>
<TITLE> Apache Test </TITLE>
<META HTTP-EQUIV="Content-type" CONTENT="text/html;charset=euc-kr">
</HEAD>
<BODY>
안녕하세요..Apache Test 입니다. 한글 문자셋을 꼭 지정해 주세요.
</BODY>
</HTML>
http://localhost/test/test.html
25. JSP페이지 테스트하기
http://localhost:8080/examples/jsp/dates/date.jsp 를 이용하면 톰캣 자체의 웹서버를 이용하여 테스트합니다.
http://localhost/examples/jsp/dates/date.jsp 이렇게 해서도 같은 결과가 나오면 완벽하게 연동이 되는 것입니다.
26. 서블릿페이지 테스트하기
http://localhost/examples/servlet/HelloWorldExample
성공적으로 나오면 이것으로 환경 설정이 끝난 것입니다.
27. 지금까지 진행된 작업의 영문은 아래와 같습니다.
http://www.johnturner.com/howto/winxp-howto.html
Windows 2000/XP - Apache + JK + Tomcat HOWTO
updated: 05/06/2003
DISCLAIMER: this is for Windows 2000 Professional and XP Professional. It does not cover setting up
Apache + Tomcat on a server such as Windows 2000 Server/Advanced Server for production use. This is
because I have no access to a Windows 2000 server, nor do I use Windows servers for production use. My
only access to Windows are desktop installations of Windows 2000 Professional and XP Professional. If
you are a Windows 2000 server administrator, my guess is that you have the skills to take these
instructions and adapt them to your platform accordingly. If you are unable to do this, please consult
the tomcat-user mailing list for help or go flag down your neighborhood Windows sys-admin and ask them
for help.
This HOWTO is for Windows 2000 Professional and XP Professional. It assumes that you have some basic
knowledge of how to make things work on your Windows computer, such as enabling and disabling services
and creating new directories. NOTE: this process is not a simple one-click "install this software and
use the defaults" process. If that's all you know how to do with your computer, find a friend to help
you, as things will be a little bit more complicated than that, but certainly something someone with
basic system administration skills can handle. If you must have a JSP and Java servlet environment, and
you aren't comfortable configuring things manually, then stick with Tomcat by itself, don't try to
install Apache as well. You'll be able to get started with your JSP and Java servlet development much
faster and easier that way.
Installing the JDK
1. You'll need to go to http://java.sun.com/j2se/1.4.1/download.html and get the JDK version of J2SE
1.4.1. The JRE version works for Tomcat in some circumstances, but unless you know exactly what you are
doing, the full JDK is the better choice. Its a big download (38Mb), so plan accordingly.
2. Run the installer. Take the defaults. This will install the JDK in c:j2sdk1.4.1_01.
3. Setup the JAVA_HOME environment variable. Click Start->Control Panel->System. Then click Advanced,
then click "Environment Variables".
4. Under System variables, click "New". For Variable Name, use JAVA_HOME (exactly like that, case and
all). For Variable Value, use c:j2sdk1.4.1_01. Click OK until the Control Panel is closed.
5. Verify the setting. Click Start->Run, and in the command box type "cmd" and click OK. At the command
prompt, type echo %JAVA_HOME% and verify that the value returned matches the Variable Value from step 4.
Installing Apache
1. First, make sure there is no web server running on port 80 on your machine. It's possible that you
have IIS installed and running, and you don't even know it. Go to Start->Administrative Tools->Services,
and look for a service named "World Wide Web Publishing". If that service is listed, click on it's name,
then click the "Stop" button in the toolbar. The stop button is a square. Then, choose Properties in the
toolbar, and set "Startup Type" to "Manual" instead of "Automatic". This will prevent IIS from starting
on your machine when it is rebooted. Only one service can run on port 80 at a time, and in this HOWTO
that service will be Apache, not IIS.
2. Download the Apache binary for Windows. Choose a mirror site, and get the MSI installer. This will
make things easier. The current version of Apache is 2.0.44. YOu can get the MSI installer from a
mirror: http://httpd.apache.org/download.cgi
3. Save the MSI installer to a location on your hard drive. Wherever you put it, remember that location.
4. Click Start->Run->Browse, and browse to the location where you put the MSI installer. Run the MSI
installer. You will see a couple of screens dealing with licenses, etc. Click through those, then you
will see a screen that says "Server Information" and has some values in the fields already. Delete the
Network Domain and Server Name values, and type "localhost" into both fields. Put your email address in
the field entitled "Administrator's Email Address". Choose the option to install Apache for all users on
port 80. Click Next.
5. On the next screen, the default is "Typical". Select "Custom" and click Next.
6. The next screen says "Custom Setup". Click the "Change..." button to change the installation
directory.
7. The next screen says "Change Current Destination Folder". Click UP to the C drive, that is, C:.
Click the "new folder" icon (the folder with a "*" on it) and call the new folder "apache". Click "OK",
then click Next. The goal here is to install Apache 2.0.43 in a folder called C:apache, NOT in the
default installation folder that the installer wants to use. This is because the default installation is
a Windows-friendly location with spaces in the pathname. Spaces in pathnames can cause problems with
software developed for Linux, which is where most open source software is developed.
8. Click "Install". The installer will do its thing, and you will see various windows popping up and
disappearing. This is normal. When the installer is finished, you should see a "successful" message and
there should be a new icon in your system tray.
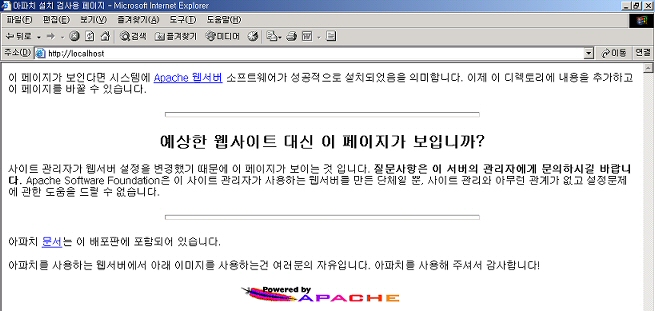
9. The installer starts Apache by default, so once the installer completes, you can open up a browser
window and browse to http://localhost. You should see the default Apache home page. If you don't see
this, go back to Step 3 and try again. The MSI installer is about as painless as you can get. This will
leave you with c:apacheApache2 as your Apache home directory.
10. Once you have verified that Apache is running on port 80, right click on the Apache System Tray icon
and choose "Open Apache Monitor". Then click the "Stop" button to stop Apache. Apache will be started
again after Tomcat and JK are installed.
Installing Tomcat
1. Create a folder on your hard drive. Call it tomcat, and put it in the C drive root, so that you end
up with C:tomcat.
2. Download the Tomcat binary. The latest version of Tomcat is 4.1.18. Get the binary for Windows here:
http://apache.mirrorcentral.com/dist/jakarta/tomcat-4/binaries/tomcat-4.1.18.exe. Save the file to your
hard drive, and remember where you put it.
3. Execute the EXE file you downloaded in Step 2. This will start the installer. Read the license, and
if you agree, click "I Agree" and go to the next screen.
4. On the next screen, select the box that says "NT Service". If you want to install the Tomcat source
code (entirely optional, you don't need it to run Tomcat) then select that option as well. Leave the
default selections as they are. Click Next.
5. On the next screen, DON'T take the installation directory default. Click the Browse button, and
choose the folder you created in Step 1. This will leave you with something like C:tomcatTomcat 4.1.
This isn't ideal...you don't want spaces in the name. Change the last part of the path to something
like "tomcat-4-1-18" so that you end up with c:tomcattomcat-4-1-18 in the directory field.
6. Click Next. The installer will start copying files. Eventually you will be presented with a screen
asking for a password for the admin user. Type in a password, making sure that you can remember it
later. Leave the port number at 8080. If you change it, you will have to manually edit Tomcat's config
files. Click Next.
7. When the installer is finished, you will have a directory structure for Tomcat at c:tomcattomcat-4-
1-18, and the service should be running. You can verify the service is running by accessing
http://localhost:8080. Note that since Tomcat is installed as a service, you can manage it with the
Services tool by clicking Start->Administrative Tools->Services and looking for service called Apache
Tomcat 4.1.
8. Verify the JSP examples work at http://localhost:8080/examples/jsp/index.html and that the servlet
examples work at http://localhost:8080/examples/servlets/index.html.
Installing the JK Connector
The JK connector is what Apache and Tomcat use to "speak" with each other. It's a separate piece of
software, distinct from both Apache and Tomcat. There is also a JK2 connector, but in this HOWTO we will
be working with the JK connector. The goal here is to get JSP and servlets to run on port 80, without
having to set Tomcat to run on port 80. It is possible to run Tomcat on port 80 as a stand-alone web
server, but in many situations, there is a need to use Apache on port 80. The connector acts as the
conduit between Apache and Tomcat in that scenario.
1. Download the JK connector here: http://jakarta.apache.org/builds/jakarta-tomcat-
connectors/jk/release/v1.2.1/bin/win32/. In our case, we want the file called mod_jk-2.0.43.dll because
we are using Apache 2.0.43.
2. The file is an Apache module, it is NOT a Tomcat JAR file or WAR file. It doesn't belong in Tomcat's
directory structure, it belongs in a place where Apache can find it. For Apache 2.0.43, that is
APACHE_HOMEmodules, where APACHE_HOME is equal to your Apache install location. In our case, that is
c:apacheApache2, so we want to put the JK DLL file into c:apacheApache2modules. You should end up
with a file called c:apacheApache2modulesmod_jk-2.0.43.dll on your hard drive. If you notice that
the other files in c:apacheApache2modules end in "*.so", that's OK. Both "*.so" and "*.dll" are valid
Apache module extensions on Windows systems.
NOTE: from now on, APACHE_HOME = c:apacheApache2 or the name of your Apache home directory.
3. Edit Apache's configuration file. It is located in APACHE_HOMEconf and is called httpd.conf. Don't
be nervous, there is a copy in the same directory called httpd.default.conf. You can always revert back
to the default settings if you need to by copying that file.
4. Edit httpd.conf in your favorite text editor. DO NOT edit it in Microsoft Word!! Use Notepad or
another editor. Scroll down to where you see a bunch of lines that say "LoadModule". At the end of this
list, add a line that says:
LoadModule jk_module modules/mod_jk-2.0.43.dll
Save the file you just edited to the APACHE_HOMEconf directory, and before going any further, verify
that you have things setup correctly. Open a command prompt window by clicking Start->Run and typing cmd
and clicking OK. At the prompt, type c:apacheApache2binApache.exe -t and hit return. You should see
a message that says "Syntax OK". If you don't see this message, go back to Step 1 and review any changes
you have made to determine the error. Note that using "-t" on the command line WILL NOT start the Apache
service, it just checks the changes that you made to httpd.conf for any errors.
5. Edit Tomcat's configuration. First, make a copy of c:tomcattomcat-4-1-18confserver.xml. Now edit
c:tomcattomcat-4-1-18confserver.xml. Look for a line that says
<Server port="8005" shutdown="SHUTDOWN" debug="0">
Just below that line, add the following:
<Listener className="org.apache.ajp.tomcat4.config.ApacheConfig" modJk="c:/apache/Apache2/modules/mod_jk-
2.0.43.dll" />
Now look for a line that says
<Host name="localhost" debug="0" appBase="webapps" unpackWARs="true" autoDeploy="true">
Just below that line, add the following:
<Listener className="org.apache.ajp.tomcat4.config.ApacheConfig" append="true" forwardAll="false"
modJk="c:/apache/Apache2/modules/mod_jk-2.0.43.dll" />
(note that this line, while similar to the first one, is different)
Save the changes you made to server.xml. Restart the Tomcat service. Wait a few seconds, and then check
to see if there is a file called mod_jk.conf in c:tomcattomcat-4-1-18confauto (c:tomcattomcat-4-1-
18confautomod_jk.conf). If there is, all is well. If there isn't, go back to the beginning of Step 5
and verify the changes you made to server.xml.
By adding the two Listener elements to server.xml, you are causing Tomcat to generate the necessary
Apache configuration directives for mod_jk automatically. You don't need to type them by hand. This is a
very convenient feature, but it is optional. If you want to configure Apache by hand, you are welcome to
do so, but that is not covered here in this HOWTO.
6. Almost done on the Tomcat side. JK, in the Apache module, uses the concept of a "worker" to send and
receive info to Tomcat. We need to tell the worker where Tomcat is, and what port we want it to use.
This is done with a workers.properties file. We want to put the workers.properties file into
c:tomcatTomcat-4-1-18confjk, though it can be anywhere. So, open up Notepad or your favorite text
editor with a blank file, and add the following lines to it:
# BEGIN workers.properties
# Definition for Ajp13 worker
worker.list=ajp13
worker.ajp13.port=8009
worker.ajp13.host=localhost
worker.ajp13.type=ajp13
# END workers.properties
Save the file as c:tomcatTomcat-4.1.18confjkworkers.properties. Note that the default name for a JK
worker is "ajp13". You can call it what you like, but my advice is don't change it until you have a
completely working installation and can see how all the pieces fit together.
7. Now go back to Apache's httpd.conf file, and edit it (c:apacheApache2confhttpd.conf). At the very
end of the file, add the following line:
Include c:/tomcat/tomcat-4-1-18/conf/auto/mod_jk.conf
Save the file, and verify your syntax by running c:apacheapache2binapache.exe -t at a command
prompt. You should see a message that says "Syntax OK". If you don't see this message, review the edits
you just made and make sure that c:/tomcat/tomcat-4-1-18/conf/auto/mod_jk.conf and workers.properties
actually exist where they should.
Installation Checklist
OK, that was a lot of work. By now, you should have the following environment:
JDK installed in c:j2sdk1.4.1_01
JAVA_HOME environment variable set for all users (System level) to c:j2sdk1.4.1_01
The JK DLL downloaded from the Jakarta site and placed in c:apacheApache2modules
Apache installed in c:apacheapache2, with "Syntax OK" messages after both the LoadModule edit and the
Jk/Include edit, and able to view the Apache welcome page at http://localhost
Tomcat installed in c:tomcattomcat-4-1-18, successfully restarted with both Listener element edits to
server.xml, and able to view the Tomcat welcome page and execute the Tomcat examples at
http://localhost:8080
A file called workers.properties located in c:tomcatTomcat-4-1-18confjk
Checking Your Installation
1. Start Tomcat as a service using the service control panel. Start->Application Tools->Services. If
Tomcat is running, stop it and then start it. Wait a few seconds before continuing.
2. Start Apache using the Apache Monitor in your System Tray. Right click on the System Tray icon, and
choose "Open Apache Monitor", then click "Start". Wait a few seconds before continuing.
3. Verify the Apache welcome page at http://localhost
4. Verify the Tomcat examples at http://localhost:8080/examples/jsp/index.html
5. Verify Tomcat examples available on port 80 at http://localhost/examples/jsp/index.html
If you can execute the Tomcat examples successfully without "8080" on the URL, then mod_jk is working
correctly.
For more info, consult the Tomcat documentation as well as the tomcat-user mailing list. If you want to
use this HOWTO for something other than "localhost", then all you have to do is use "www.your-
domain.com" everywhere it says "localhost". My advice in that scenario would be to copy the existing,
default Host container in Tomcat's server.xml, and change the "name" parameter to "www.your-domain.com",
then restart Tomcat (to re-gen mod_jk.conf with the new hostname) and restart Apache. Making a copy of
the localhost Host container in server.xml will leave the localhost container as a failsafe default,
which might cut down on problems in the future.
NOTE: in Tomcat, virtual hosts are "Hosts". That is, as far as Tomcat is concerned, localhost is a
virtual host. So, if you want to setup www.server-a.com and www.server-b.com, you just need more copies
of the Host container included in the default server.xml that comes with Tomcat. Doing it in production
is a little more complicated than that, but that's the essence of how to get Tomcat to work for more
than localhost. Because this HOWTO describes using the Apache auto-config option of JK, getting Tomcat
to work with your virtual hosts means Apache will work. This means that you can test your URL and your
application contexts using ":8080" on your URL without affecting Apache. When you have it working,
simply restart Apache so that it picks up the new mod_jk.conf file generated by Tomcat and you should be
well on your way.
Back To Menu
Please send comments, suggestions, or changes to john AT johnturner DOT com. Be advised that I will be
happy to help where I can, but I am not available for free one-on-one tech support to the whole
world. :)
Copyright ?2002 John Turner. All rights reserved.