

| sitelink1 | https://blog.naver.com/jcosmoss/221546907367 |
|---|---|
| sitelink2 | |
| sitelink3 |
이번 코틀린 예제는 구글의 ML(머신러닝) 키트를 이용해서 바코드(RQ코드) 스캐너를 만들어 보자.
안드로이드 스튜디오에서 새로운 프로젝트를 시작하자.
메뉴 Tools에서 Firebas를 선택한다.
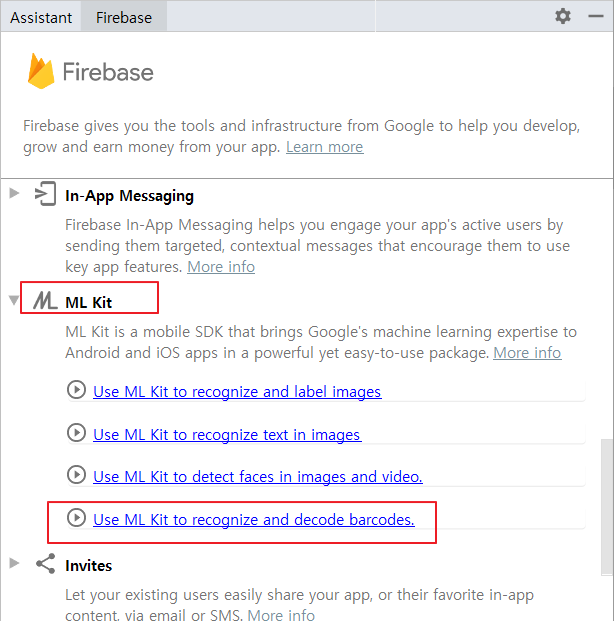

ML Kit중에서 barcode 를 선택한다. 여러가지가 있다.
나머지는 다음에 해보기로 하자.
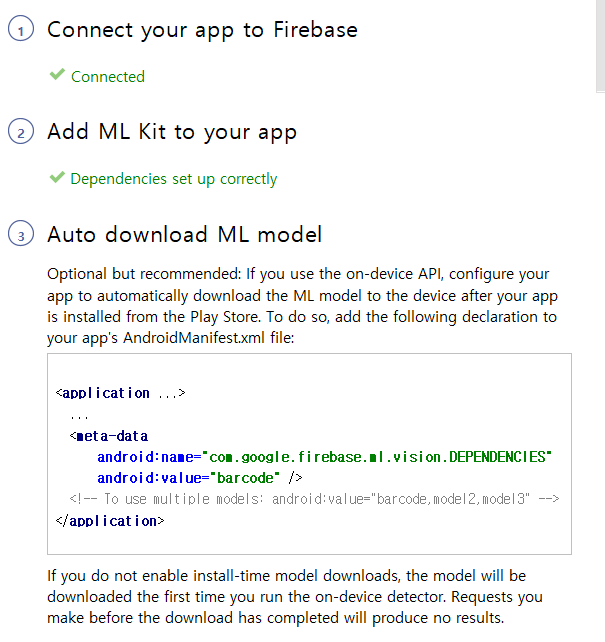

가이드 대로 3단계까지 진행해 준다.
프로젝트를 만들고 앱에 ML킷을 추가하고 Manifest 파일에 meta-data 태그도 추가해 준다.
작업에 필요한 것들이 자동으로 추가 되어 진다.
따로 json파일을 다운로드 하거나 라이브러리를 추가해 줘야 하는 번거로움이 없다.
<?xml version="1.0" encoding="utf-8"?> <manifest xmlns:android="http://schemas.android.com/apk/res/android" package="com.js.kotlin_barcodescanner"> <uses-permission android:name="android.permission.INTERNET" /> <uses-permission android:name="android.permission.CAMERA" /> <application android:allowBackup="true" android:icon="@mipmap/ic_launcher" android:label="@string/app_name" android:roundIcon="@mipmap/ic_launcher_round" android:supportsRtl="true" android:theme="@style/AppTheme"> <activity android:name=".MainActivity"> <intent-filter> <action android:name="android.intent.action.MAIN"/> <action android:name="android.intent.action.VIEW"/> <category android:name="android.intent.category.LAUNCHER"/> </intent-filter> </activity> <!--플레이스토어에서 앱 설치후 기기에 머신러닝 모델을 자동으로 다운로드 함--> <meta-data android:name="com.google.firebase.ml.vision.DEPENDENCIES" android:value="barcode" /> </application> </manifest><?xml version="1.0" encoding="utf-8"?> <manifest xmlns:android="http://schemas.android.com/apk/res/android" package="com.js.kotlin_barcodescanner"> <uses-permission android:name="android.permission.INTERNET" /> <uses-permission android:name="android.permission.CAMERA" /> <application android:allowBackup="true" android:icon="@mipmap/ic_launcher" android:label="@string/app_name" android:roundIcon="@mipmap/ic_launcher_round" android:supportsRtl="true" android:theme="@style/AppTheme"> <activity android:name=".MainActivity"> <intent-filter> <action android:name="android.intent.action.MAIN"/> <action android:name="android.intent.action.VIEW"/> <category android:name="android.intent.category.LAUNCHER"/> </intent-filter> </activity> <!--플레이스토어에서 앱 설치후 기기에 머신러닝 모델을 자동으로 다운로드 함--> <meta-data android:name="com.google.firebase.ml.vision.DEPENDENCIES" android:value="barcode" /> </application> </manifest>
Manifest 파일에 두개의 퍼미션도 추가해 준다. 인터넷과 카메라 퍼미션이다.
이제 메인 레이아웃을 수정하자.

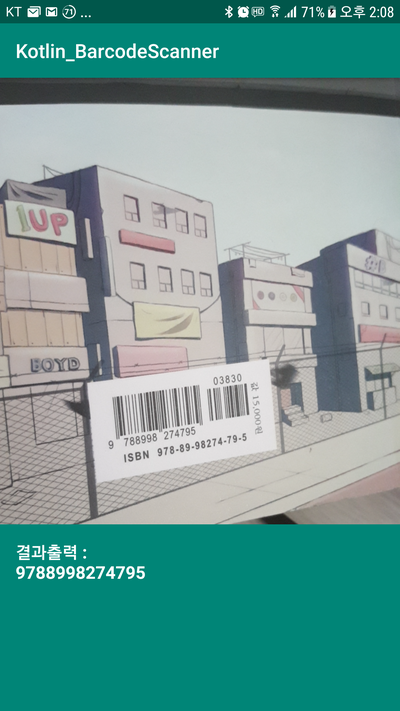
구조는 단순한다. 카메라를 위한 서페이스뷰와 그 하단에 결과를 보여 주는 텍스트뷰가 전부이다. 앱을 켜면 바로 이 화면이다. 목적에 따라 버튼을 반들거나 어쩌거나 해주면 된다. 하지만 그런건 쓸데없는 동작이다. QR코드를 만났으면 빠르고 쉽게 그 담겨진 내용을 캐치하면 그만이다.
<?xml version="1.0" encoding="utf-8"?> <android.support.constraint.ConstraintLayout xmlns:android="http://schemas.android.com/apk/res/android" xmlns:tools="http://schemas.android.com/tools" xmlns:app="http://schemas.android.com/apk/res-auto" android:layout_width="match_parent" android:layout_height="match_parent" tools:context=".MainActivity"> <SurfaceView android:layout_width="match_parent" android:layout_height="match_parent" android:id="@+id/sv_barcode" app:layout_constraintEnd_toEndOf="parent" app:layout_constraintStart_toStartOf="parent" app:layout_constraintTop_toTopOf="parent" app:layout_constraintBottom_toBottomOf="parent"/> <TextView android:id="@+id/tv_barcode" android:layout_width="match_parent" android:layout_height="wrap_content" android:padding="16dp" android:layout_alignParentBottom="true" app:layout_constraintBottom_toBottomOf="parent" android:background="@color/colorPrimary" android:textColor="@android:color/white" android:textStyle="bold" android:textSize="18sp" android:height="@android:dimen/thumbnail_width"/> </android.support.constraint.ConstraintLayout>?xml version="1.0" encoding="utf-8"?> <android.support.constraint.ConstraintLayout xmlns:android="http://schemas.android.com/apk/res/android" xmlns:tools="http://schemas.android.com/tools" xmlns:app="http://schemas.android.com/apk/res-auto" android:layout_width="match_parent" android:layout_height="match_parent" tools:context=".MainActivity"> <SurfaceView android:layout_width="match_parent" android:layout_height="match_parent" android:id="@+id/sv_barcode" app:layout_constraintEnd_toEndOf="parent" app:layout_constraintStart_toStartOf="parent" app:layout_constraintTop_toTopOf="parent" app:layout_constraintBottom_toBottomOf="parent"/> <TextView android:id="@+id/tv_barcode" android:layout_width="match_parent" android:layout_height="wrap_content" android:padding="16dp" android:layout_alignParentBottom="true" app:layout_constraintBottom_toBottomOf="parent" android:background="@color/colorPrimary" android:textColor="@android:color/white" android:textStyle="bold" android:textSize="18sp" android:height="@android:dimen/thumbnail_width"/> </android.support.constraint.ConstraintLayout>
이제 메인액티비티에서 코드를 작성하자.
class MainActivity : AppCompatActivity() { private lateinit var svBarcode: SurfaceView private lateinit var tvBarcode: TextView private lateinit var detector: BarcodeDetector private lateinit var cameraSource: CameraSource override fun onCreate(savedInstanceState: Bundle?) { super.onCreate(savedInstanceState) setContentView(R.layout.activity_main) svBarcode = findViewById(R.id.sv_barcode) tvBarcode = findViewById(R.id.tv_barcode) detector = BarcodeDetector.Builder(this).setBarcodeFormats(Barcode.ALL_FORMATS).build() detector.setProcessor(object : Detector.Processor<Barcode>{ override fun release() { } override fun receiveDetections(detections: Detector.Detections<Barcode>?) { var barcodes = detections?.detectedItems if(barcodes!!.size() > 0){ val builder = StringBuilder() tvBarcode.post{ builder.append("결과출력 : ") builder.append("\n") builder.append(barcodes.valueAt(0).displayValue) tvBarcode.text = builder.toString() //tvBarcode.text = barcodes.valueAt(0).displayValue } } } }) cameraSource = CameraSource.Builder(this, detector).setRequestedPreviewSize(1024, 768) .setRequestedFps(25f).setAutoFocusEnabled(true).build() svBarcode.holder.addCallback(object : SurfaceHolder.Callback2{ override fun surfaceRedrawNeeded(holder: SurfaceHolder?) {} override fun surfaceChanged(holder: SurfaceHolder?, format: Int, w: Int, h: Int) {} //당장 필요한것은 아래 두개의 메소드이다. override fun surfaceDestroyed(holder: SurfaceHolder?) { cameraSource.stop() } override fun surfaceCreated(holder: SurfaceHolder?) { //카메라 퍼미션 체크후에 진행 if(ContextCompat.checkSelfPermission(this@MainActivity, android.Manifest.permission.CAMERA) == PackageManager.PERMISSION_GRANTED){ cameraSource.start(holder) } else { ActivityCompat.requestPermissions(this@MainActivity, arrayOf(android.Manifest.permission.CAMERA), 123) } } }) } @SuppressLint("MissingPermission") override fun onRequestPermissionsResult(requestCode: Int, permissions: Array<out String>, grantResults: IntArray) { super.onRequestPermissionsResult(requestCode, permissions, grantResults) if(requestCode == 123){ if(grantResults.isNotEmpty() && grantResults[0] == PackageManager.PERMISSION_GRANTED){ cameraSource.start(svBarcode.holder) } else { Toast.makeText(this, "스캐너는 카메라 권한이 허용되어야 사용 가능합니다.", Toast.LENGTH_SHORT).show() } } } override fun onDestroy() { super.onDestroy() detector.release() cameraSource.stop() cameraSource.release() } }