

| sitelink1 | https://guides.github.com/activities/hello-world/ |
|---|---|
| sitelink2 | http://blog.naver.com/noah2021/220808875016 |
| sitelink3 |
The Hello World project is a time-honored tradition in computer programming. It is a simple exercise that gets you started when learning something new. Let’s get started with GitHub!
You’ll learn how to:
- Create and use a repository
- Start and manage a new branch
- Make changes to a file and push them to GitHub as commits
- Open and merge a pull request
우리는 이 예제에서
'repository'를 만들고 사용하는 방법과,
새로운 'branch'를 시작하고 관리하는 방법,
파일을 수정하고 그것을 GitHub에 commits 으로 반영하는 방법,
전체 request 를 열고 합치는 방법에 대해 알아볼 것이다.
What is GitHub?
GitHub is a code hosting platform for version control and collaboration. It lets you and others work together on projects from anywhere.
This tutorial teaches you GitHub essentials like repositories, branches, commits, and Pull Requests. You’ll create your own Hello World repository and learn GitHub’s Pull Request workflow, a popular way to create and review code.
GitHub 는 버전관리와 협업을 위한 코드 호스팅 플랫폼이다. 우리는 이것을 이용해 어디에서든 함께 일할 수 있다.
이 튜토리얼은 당신에게 GitHub의 기본이 되는 repositories, branches, commits, pull requests 를 알려줄 것이다.
당신은 Hello World repository 를 만들며 GitHub의 Pull Request가 어떻게 진행되는지 알게 될 것이다.
또한 코드를 만들고 리뷰하는 일반적인 방법에 대해서도 알게 될 것이다.
No coding necessary
To complete this tutorial, you need a GitHub.com account and Internet access. You don’t need to know how to code, use the command line, or install Git (the version control software GitHub is built on).
Tip: Open this guide in a separate browser window (or tab) so you can see it while you complete the steps in the tutorial.
코딩을 할 줄 몰라도 괜찮다.
이 튜토리얼을 진행하기 위해, 당신은 GitHub.com 에 가입해야 하며, 인터넷에 연결되어 있어야 한다.
코드를 쓸 줄 몰라도, 커맨드라인을 쓸 줄 몰라도, Git 을 설치할 줄 몰라도 괜찮다.
Tip: 이 창을 옆으로 빼 놓고 진행하면서 함께 보면 편하다.
Step 1. Create a Repository
A repository is usually used to organize a single project. Repositories can contain folders and files, images, videos, spreadsheets, and data sets – anything your project needs. We recommend including a README, or a file with information about your project. GitHub makes it easy to add one at the same time you create your new repository. It also offers other common options such as a license file.
Your hello-world repository can be a place where you store ideas, resources, or even share and discuss things with others.
repository 는 개별 프로젝트를 구성하는데 주로 사용된다. repositories 는 폴더나 파일, 이미지, 비디오, 스프레드시트, 데이터 셋(이게뭘까?) 을 포함할 수 있다. 즉, 당신이 프로젝트를 진행하는데 필요한 모든 것을 포함할 수 있다. README 를 repositories 에 포함하는 것을 추천한다. (README 는 보통 설치할 때 따라오는 설명서 같은 녀석이다. 설치할 때 선택하는 메뉴가 있음)
Hello-world repository 는 나중에 다양한 용도로 사용할 수 있다.
To create a new repository
- In the upper right corner, next to your avatar or identicon, click and then select New repository.
- Name your repository
hello-world. - Write a short description.
- Select Initialize this repository with a README.
1. GitHub 홈에서 오른쪽 위를 보면 당신의 프로필 아이콘 옆에 + 모양이 있다.
그걸 눌러서 New repository 를 선택한다.
2. repository 이름을 hello-world 로 지정하자.
3. 간단하게 repository 에 대한 설명을 써주고
4. README 가 따라오도록, Initialize this repository with a README 에 체크해준다.
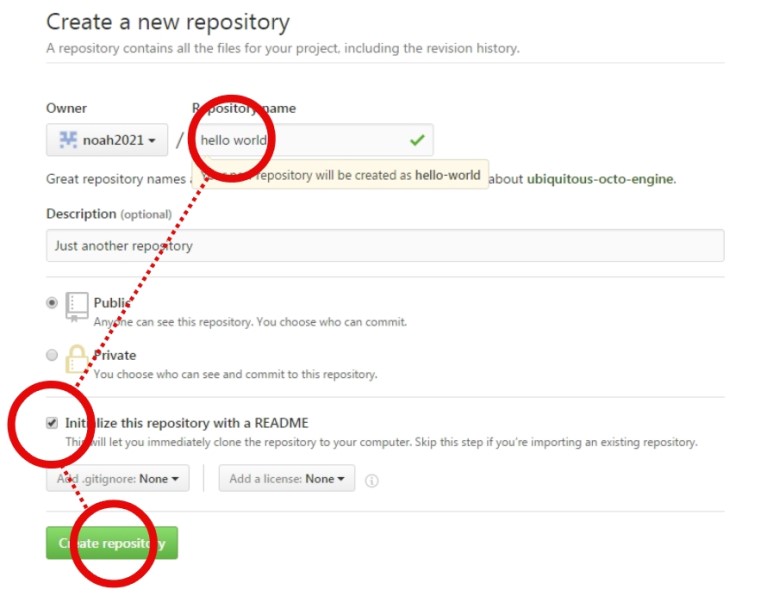
Click Create repository. ![]()
Step 2. Create a Branch
Branching is the way to work on different versions of a repository at one time.
By default your repository has one branch named master which is considered to be the definitive branch. We use branches to experiment and make edits before committing them to master.
When you create a branch off the master branch, you’re making a copy, or snapshot, of master as it was at that point in time. If someone else made changes to the master branch while you were working on your branch, you could pull in those updates.
Branching 은 다양한 버전의 repository 를 한번에 사용하는 방법이다. 기본적으로 당신의 repository 는 'master' 라는 이름을 가진 branch를 가지고 있다. 이 repository는 최종 확정된 branch 로 간주된다. 우리는 Branch들을 만들어 실험을 하고 master가 되도록 수정할 것이다.
우리가 master branch 의 branch off (분기점??하위항목??)를 만들고 있을 때, 누군가 master branch를 수정한다면 당신의 작업이 그쪽으로 수정될 수 있다.
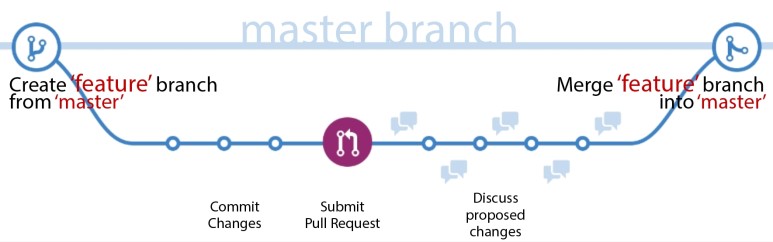
This diagram shows:
- The
masterbranch - A new branch called
feature(because we’re doing ‘feature work’ on this branch) - The journey that
featuretakes before it’s merged intomaster
아래의 다이어그램은 이러한 것들을 보여준다.
- 마스터 브랜치
- 피쳐 라고 불리는 새로운 브랜치 (그 브랜치 안에서 feature work 를 하기때문에 feature 로 불림)
- feature 가 master 에 합쳐지기 까지의 과정
Have you ever saved different versions of a file? Something like:
story.txtstory-joe-edit.txtstory-joe-edit-reviewed.txt
Branches accomplish similar goals in GitHub repositories.
당신은 다양한 버전의 파일을 저장해 본 적이 있습니까?
예를 들어, 문서1 수정.txt / 문서1 수정-재수정.txt.......
branch는 GitHub repositories 에서 이와 비슷한 목적을 가지고 있다.
(branch = 가지)
Here at GitHub, our developers, writers, and designers use branches for keeping bug fixes and feature work separate from our master (production) branch. When a change is ready, they merge their branch into master.
GitHub는 개발자와 writer 와 디자이너가 마스터 브랜치에서 따로 떨어져 이런 저런 작업을 할 수 있게 해준다. 우리는 완벽한 준비를 끝낸 다음, 수정한 브랜치를 마스터 브랜치에 합칠 수 있다.
To create a new branch
- Go to your new repository
hello-world. - Click the drop down at the top of the file list that says branch: master.
- Type a branch name,
readme-edits, into the new branch text box. - Select the blue Create branch box or hit “Enter” on your keyboard.
새로운 브랜치를 만들기 위해
1. hello-world repository 에 들어간다.
2. 파일리스트 가장 위에 있는 branch:master 를 누른다.
3. 이름을 써주고,
4. 파란 부분을 누르거나 enter 키를 눌러서 완료한다.
Now you have two branches, master and readme-edits. They look exactly the same, but not for long! Next we’ll add our changes to the new branch.
이제 당신은 master 와 readme-edits 두 개의 브랜치를 가지고 있다. 이 두 브랜치가 지금은 똑같아 보이지만, 우리가 지금부터 새로운 브랜치를 뜯어고칠 것이다.
Step 3. Make and commit changes
Bravo! Now, you’re on the code view for your readme-edits branch, which is a copy of master. Let’s make some edits.
On GitHub, saved changes are called commits. Each commit has an associatedcommit message, which is a description explaining why a particular change was made. Commit messages capture the history of your changes, so other contributors can understand what you’ve done and why.
이제 당신은 readme-edits 브랜치에 들어와 있다. 이 브랜치는 master 의 카피버전이다. 이제부터 이 복사본을 수정해 보자.
GitHub에서 모든 변화는 commits 라고 불린다. (아하... 사전에 검색하면 commit 이 (그릇된 일, 또는 범죄를) 저지르다 라고 나와서 의아했었음) 모든 commit 은 관련된 commit message를 하나씩 가지고 있다. commit message는 당신이 만든 변화를 캡쳐한다. 따라서 다른 참여자가 당신이 무엇을, 왜 했는지 알 수 있다.
Make and commit changes
- Click the
README.mdfile. - Click the pencil icon in the upper right corner of the file view to edit.
- In the editor, write a bit about yourself.
- Write a commit message that describes your changes.
- Click Commit changes button.
1. README.md 파일을 누른다.
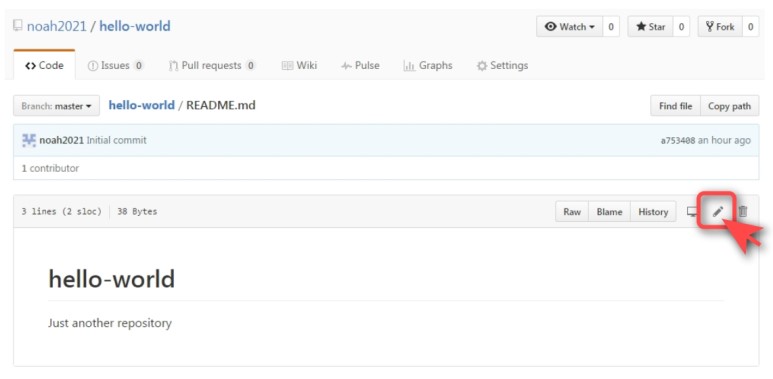
2. 우측 위의 연필모양 아이콘을 누른다.
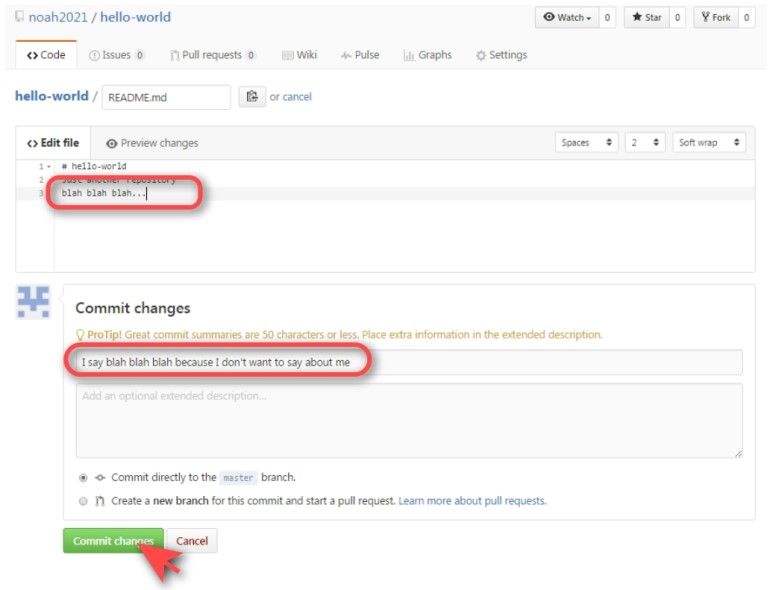
These changes will be made to just the README file on your readme-editsbranch, so now this branch contains content that’s different from master.
3,4,5. 내용과 commit message 를 작성하고 초록색 버튼을 누른다.
이제 당신의 브랜치는 마스터와 다른 내용을 가지게 되었다.
Step 4. Open a Pull Request
Nice edits! Now that you have changes in a branch off of master, you can open a pull request.
Pull Requests are the heart of collaboration on GitHub. When you open a pull request, you’re proposing your changes and requesting that someone review and pull in your contribution and merge them into their branch. Pull requests showdiffs, or differences, of the content from both branches. The changes, additions, and subtractions are shown in green and red.
이제 우리의 branch off (아마도 수정한 새 브랜치를 말하는 듯) 는 master 와 달라졌다. 당신은 pull request 를 열 수 있다.
Pull Requests 란 GitHub 협업의 심장이다. 당신이 Pull request를 열었을때, 당신은 당신이 생각한 변화를 제안할 수 있고, 다른 사람의 리뷰를 요청할 수 있으며, 기여를 받을 수 있고, 그것들을 그들의 브랜치에 합칠 수 있다. Pull request 는 양쪽 브랜치의 diffs(= differences) 를 보여준다. 변한 부분, 추가된 부분, 삭제된 부분이 초록색과 붉은색으로 표시된다.
As soon as you make a commit, you can open a pull request and start a discussion, even before the code is finished.
By using GitHub’s @mention system in your pull request message, you can ask for feedback from specific people or teams, whether they’re down the hall or 10 time zones away.
You can even open pull requests in your own repository and merge them yourself. It’s a great way to learn the GitHub Flow before working on larger projects.
당신이 commit 을 작성하면 그 즉시 pull request 를 열고 토의하는 것이 가능해진다. 코드가 완성되지 않았어도 상관없다.
GitHub 의 mention 시스템을 사용하여 특정한 사람이나 팀에게 피드백을 요청할 수 있다. 그들이 아주 먼 곳에 있더라도 말이다.
당신은 pull requests 를 당신 개인의 repository 에 열거나 그것들을 당신 스스로 합칠 수 있다. 이것은 큰 프로젝트를 진행하기 전 GitHub의 흐름을 익히는 훌룡한 방식이다.
Open a Pull Request for changes to the README
Click on the image for a larger version
| Step | Screenshot |
|---|---|
| Click the Pull Request tab, then from the Pull Request page, click the green New pull request button. |  |
Select the branch you made,readme-edits, to compare with master (the original). |
 |
| Look over your changes in the diffs on the Compare page, make sure they’re what you want to submit. |  |
| When you’re satisfied that these are the changes you want to submit, click the big green Create Pull Requestbutton. |  |
| Give your pull request a title and write a brief description of your changes. |  |
When you’re done with your message, click Create pull request!
Tip: You can use emoji and drag and drop images and gifs onto comments and Pull Requests.
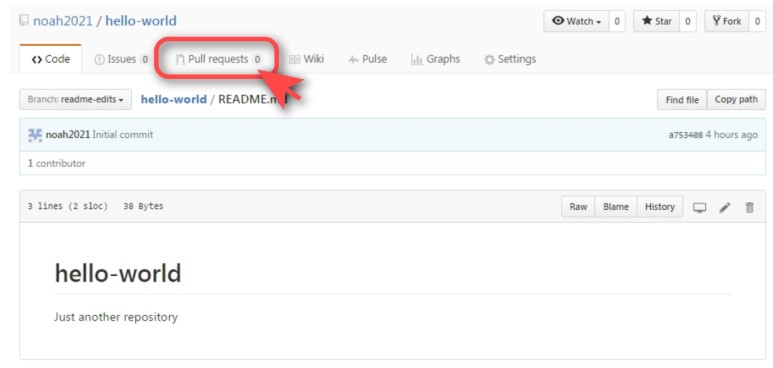
Pull requests 탭을 클릭한다.
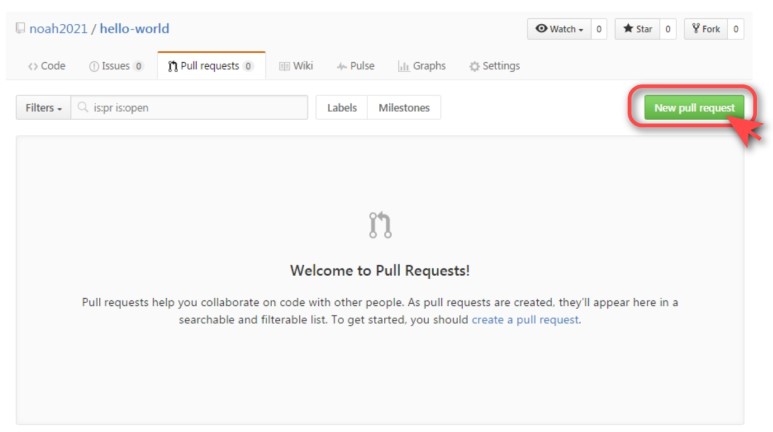
Pull requests 탭의 초록버튼 클릭. New pull request
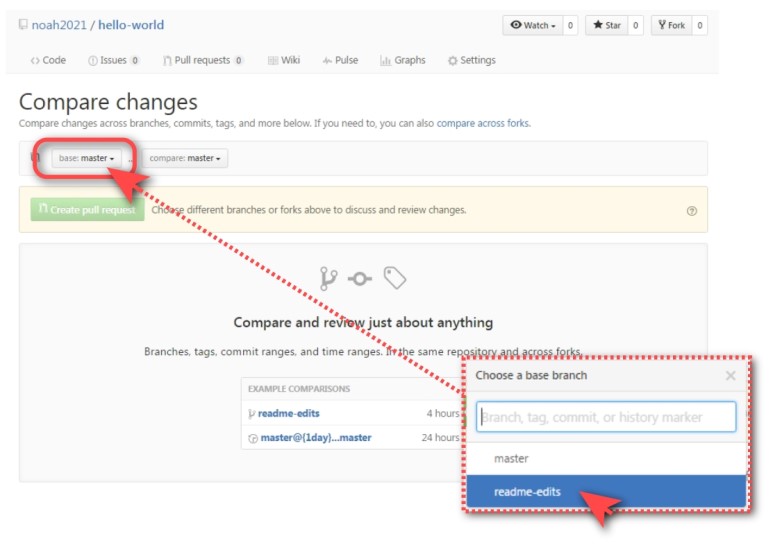
[Compare changes] 화면에서 base 를 readme-edits 로 바꿔준다.
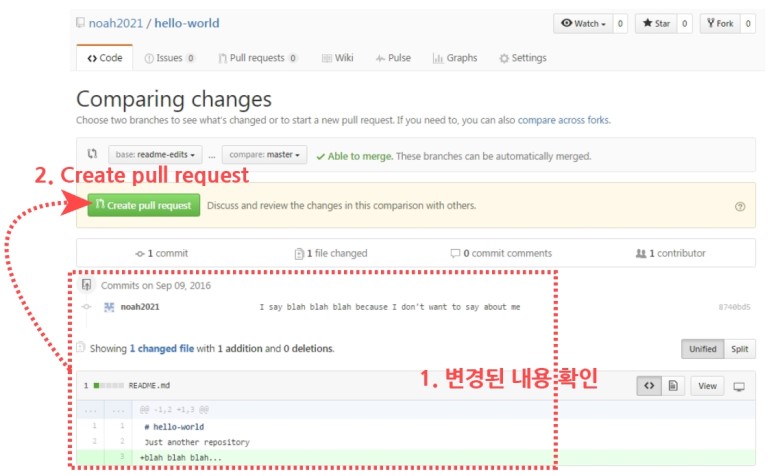
내용을 확인하고 create pull request 버튼을 누른다.
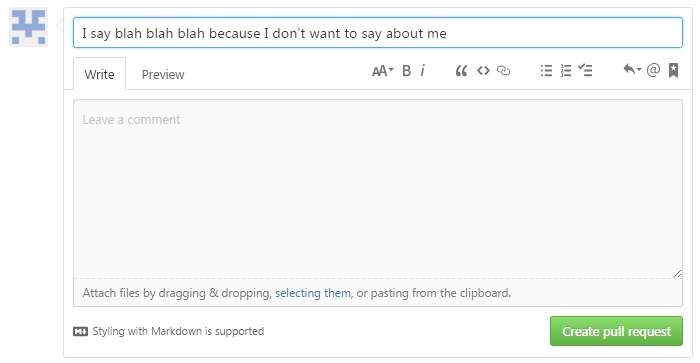
create pull request 를 누르면 나오는 창에 설명을 적어주고, 초록버튼을 누르자.
Tip. 당신은 코멘트나 pull requests에 이모지, 이미지, gif 를 사용할 수 있다.
Step 5. Merge your Pull Request
In this final step, it’s time to bring your changes together – merging yourreadme-edits branch into the master branch.
- Click the green Merge pull request button to merge the changes into
master. - Click Confirm merge.
- Go ahead and delete the branch, since its changes have been incorporated, with the Delete branch button in the purple box.


Celebrate!
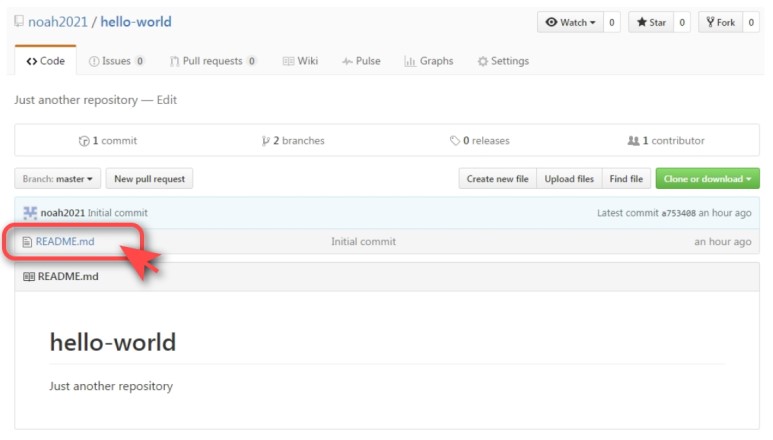
By completing this tutorial, you’ve learned to create a project and make a pull request on GitHub! ![]()
![]()
![]()
Here’s what you accomplished in this tutorial:
- Created an open source repository
- Started and managed a new branch
- Changed a file and committed those changes to GitHub
- Opened and merged a Pull Request
Take a look at your GitHub profile and you’ll see your new contribution squares!
If you want to learn more about the power of Pull Requests, we recommend reading the GitHub Flow Guide.
You might also visit GitHub Explore and get involved in an Open Source project ![]()
Tip: Check out our other Guides and YouTube Channel for more GitHub how-tos.