

| sitelink1 | http://egloos.zum.com/zeraf29/v/7278973 |
|---|---|
| sitelink2 | |
| sitelink3 |
VisualSVN 은 기본적으로 https 프로토콜만 지원한다.
(ex: https://localhost/SVNRepository)
하지만 종종 https가 아닌 SVN프로토콜이 필요할 때가 있다.
이 경우는 직접 VisualSVN 이 설치된 경로 안에 있는 svnserve.exe를 구동시키고 등록시켜서 SVN프로토콜을 열어줘야 한다.
(정확히는, 동일한 repository를 쓰는 SVN 두 개를 돌리는 거라고 생각하면 된다.)
방법은 아래와 같다.
1. CMD창을 키고 아래를 입력한다.
sc create svnserve binpath= "\"C:\Program Files\VisualSVN Server\bin\svnserve.exe\" --service -r C:\repositories" displayname= "Subversion Server" depend= Tcpip start= auto
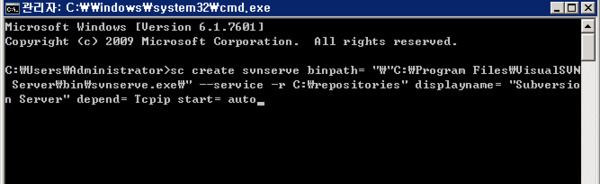
해당 내용은 svnserve.exe를 윈도우즈 서비스에 등록(sc create svnserve)하는 과정이다.
(1)binpath= "\"C:\Program Files\VisualSVN Server\bin\svnserve.exe\"
VisualSVN이 설치된 경로 안의 svnserve.exe가 있는 경로를 넣어준다. 본인이 기본 위치 외 다른 곳에 VisualSVN을 설치했으면
해당 경로에 맞춰 넣어준다.
(2) -r C:\repositories
연결할 SVN repostories 경로를 넣어준다. VisualSVN과 동일한 곳을 연결해주려면, 앞서 VisualSVN에서 사용한 repository 경로를 넣어준다.
(3)displayname= "Subversion Server"
윈도우 서비스에 표시될 이름
(4) depend= Tcpip
Tcp/IP 서비스가 시작된 이후에 기동되게끔 설정
(5)start= auto
자동 시작 여부
2. net start svnserve (또는 서비스 창에서 시작)
등록된 서비스를 등록하는 과정이다. CMD창에서 net start svnserve 를 입력하거나,
windows service 창에서 구동시켜 준다.

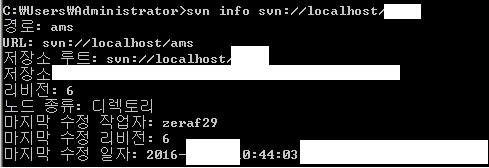
3. 정상구동확인
CMD 창에서 아래와 같이 입력하여 정상 구동 여부를 확인한다.
아래와 같이 출력된다면 정상 구동
svn info svn://localhost/repository이름
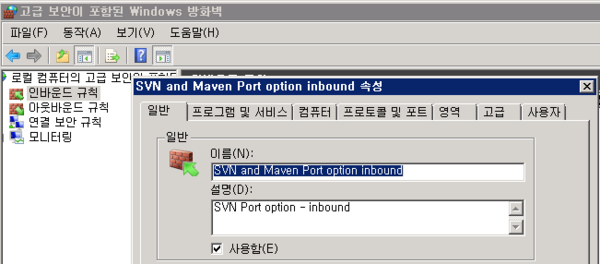
4. 방화벽 설정
외부에서 접속하여 쓰게하기 위해선 해당 포트에 대해 방화벽을 열어줘야 한다.
svn프로토콜의 기본 포트는 3690 포트 이며 다르게 설정해줬을 경우 해당 포트값에 대해
윈도우 방화벽을 열어준다.
제어판>windows방화벽>고급설정 메뉴로 들어가서
"인바운드", "아웃바운드" 부분에 해당 정책 생성 후 "프로토콜 및 포트" 부분에서 해당 포트를 허용해줘야 한다.
5. repository 접근 권한 설정
visualSVN에 있는 svnserve를 켰지만, 저장소 접근 권한은 visualSVN과 별도로 설정된다.
c:\Repositories(저장소가 저장된 경로)\저장소이름\conf 안에 있는 아래의 파일을 수정해야 한다.
(1)passwd
사용자 접근 정보를 입력한다. 해당 파일을 열어 #주석 처리 된 내용과 동일한 구조로 입력한다.
(해당 파일의 [users] 밑에 계정ID = 비밀번호 형태로 입력한다.)
(2)svnserve.conf
접근권한 정도를 수정한다.
해당 파일을 열어 아래 부분을 찾아 주석을 제거(# 제거)하고 수정한다.
anon-access : passwd파일 정의 안된 인원이 접근할 경우의 권한.
none 은 아무것도 허용 안하는 것이며, read는 읽기 권한만, write는 read/write 권한이다.
auth-access : passwd파일 안에 정의된 인원이 접근할 경우의 권한.내용 별 권한은 위와 동일하다.
password-db = passwd : 사용자 정의 정보 설정. = 옆에 적힌 이름의 파일명과 동일한 파일 안의 내용을 적용한다.
우리는 passwd파일 안에 적었으므로 password-db = passwd로 놔둔다.
realm : 접속 시 보여질 저장소의 별칭 같은 것이다. 단, 두개의 저장소가 같은 realm 이름을 쓰면 반드시 동일한 password
database를 써야 한다.(그대로 따라했다면 동일한 저장소 이름으로 설정하면 됨)
위 5단계로 하면 visualSVN로 설치한 저장소에 대해 SVN으로 접근이 가능하다.
SVN 클라이언트 프로그램(TortoisSVN)에서 svn://해당 서버 IP:3690/저장소이름 으로 접근해보자.
--------------------------------------------------------------------------------
How to open SVN protocol on VisualSVN.
Normally, VisualSVN only support https protocol.
By you running "svnserve.exe" in VisualSVN folder, you can use SVN protocol on your VisualSVN repository.
(Actually, it's that running new svn server, not same VisualSVN server. So you have to set about svnserve after running it)
(Actually, it's that running new svn server, not same VisualSVN server. So you have to set about svnserve after running it)
1. type under sentence on your Windows CMD console. (make windows service)
sc create svnserve binpath= "\"C:\Program Files\VisualSVN Server\bin\svnserve.exe\" --service -r C:\repositories" displayname= "Subversion Server" depend= Tcpip start= auto
2. running service you made
type "net start svnserve" on your cmd console, or
running windows service you made on "service" window.
3.check your svn server
type "svn info svn://localhost/repository name" on your cmd console. then,
you can check your new svn server.
4. open your svn server port from windows firewall
Default svn sever port is "3690". you have to open it on your firewall.
Go to "windows firewall", move to advanced setting menu. And then setting your firewall's inbound/outbound for
open your port.
5. Define new authentication roll.
Move to conf folder in your repositories. (ex: C:\repositories\dev\conf")
then input or modify passwd and svnserve.conf files.
input auth data in passwd file.(follow example in it).
Modify svnserve.conf like under(you can check how to modify this on this file's annotation).
anon-access :none
auth-access : write
password-db = passwd
realm : my repository